
Can you fix lawn furniture? Yes, absolutely! With a little effort and the right approach, you can breathe new life into your beloved outdoor seating and tables, saving money and reducing waste. This guide will walk you through common lawn furniture problems and how to fix them, from minor cosmetic issues to more significant structural repairs. We’ll cover how to repair lawn chairs, restore patio furniture, mend garden seating, fix outdoor tables, refinish wicker furniture, replace cushions, clean metal furniture, protect wood furniture, reassemble patio set, and secure loose furniture.
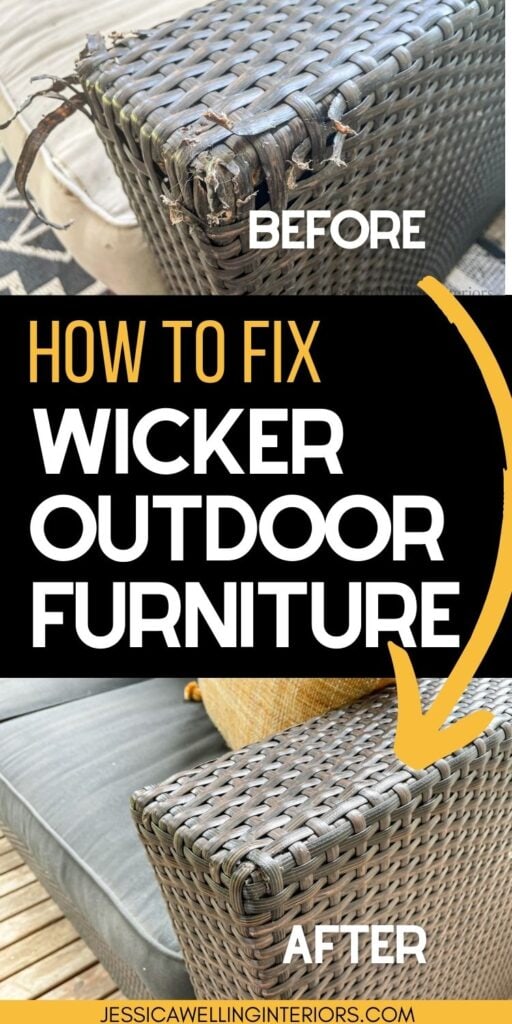
Image Source: jessicawellinginteriors.com
Breathing New Life into Worn-Out Wicker
Wicker furniture, whether natural rattan or synthetic resin, can become weathered and brittle over time. Sun, rain, and general wear can take their toll. The good news is that refinishing wicker furniture is a rewarding project that can make it look almost new again.
Natural Wicker Restoration
Natural wicker, made from materials like rattan, bamboo, or reed, requires gentle but effective care.
Cleaning Natural Wicker
Before you start any repairs, a thorough cleaning is essential.
- Dusting: Use a soft brush or vacuum cleaner with a brush attachment to remove loose dust and debris from all the nooks and crannies.
- Washing: Mix a mild soap solution (like dish soap) with warm water. Dampen a soft cloth or sponge, wring it out well, and wipe down the wicker. Avoid soaking the material.
- Rinsing: Use a clean cloth dampened with plain water to wipe away any soap residue.
- Drying: Allow the wicker to air dry completely. You can speed this up by placing it in a well-ventilated area or using a fan. Ensure it’s thoroughly dry before proceeding to any repairs.
Repairing Broken Wicker Strands
If you find broken or frayed strands, you can often repair them.
- Identify the Damage: Pinpoint the exact location of the broken strand.
- Trim Loose Ends: Carefully trim away any jagged or loose ends with sharp scissors or a craft knife.
- Apply Adhesive: For small breaks or fraying, a strong, flexible adhesive like wood glue or a specialized wicker repair glue can be used. Apply a small amount to the broken ends and press them together firmly. You might need to hold them in place for a few minutes until the glue sets.
- Reinforce: For larger breaks or weak spots, you can use a small piece of matching wicker or a thin, flexible cord. Soak the new wicker piece in warm water to make it pliable, then carefully weave or wrap it around the damaged area, securing it with glue. Let it dry completely.
Refinishing Natural Wicker
Once clean and repaired, you can refinish natural wicker for a fresh look.
- Sanding (Optional): If the wicker has a varnish or paint that is peeling, you might need to lightly sand it. Use fine-grit sandpaper (around 180-220 grit) and sand in the direction of the weave. Be gentle to avoid damaging the wicker.
- Staining or Painting: You can stain wicker to achieve a natural wood look or paint it in a vibrant color. Use water-based stains or paints for easier cleanup and less odor. Apply thin, even coats with a brush, ensuring you get into all the crevices. Allow each coat to dry completely before applying the next.
- Sealing: Once the stain or paint is dry, apply a clear sealant or varnish to protect the wicker from moisture and UV rays. Choose a sealant specifically designed for outdoor use. Apply 2-3 thin coats, allowing each to dry thoroughly.
Synthetic Wicker (Resin) Maintenance
Synthetic wicker is more durable and weather-resistant, but it can still benefit from care.
Cleaning Synthetic Wicker
- Washing: A simple wash with mild soap and water is usually sufficient. Use a soft brush or cloth.
- Stubborn Grime: For tougher dirt or mildew, you can use a solution of equal parts water and white vinegar or a diluted all-purpose cleaner. Scrub gently and rinse thoroughly.
- Drying: Let it air dry completely.
Repairing Synthetic Wicker
Synthetic wicker is harder to repair when it comes to broken strands, as it’s often extruded plastic. If strands break, it’s usually more practical to replace entire sections or consider it a sign that the furniture may be nearing the end of its useful life, unless the break is minor and can be glued discreetly.
Revitalizing Metal Lawn Furniture
Metal furniture, like aluminum, wrought iron, or steel, is popular for its durability. However, rust, scratches, and fading are common issues. Clean metal furniture and address these problems to restore its former glory.
Preparing Metal Furniture for Repair
- Cleaning: Wash the furniture thoroughly with soapy water to remove dirt, grime, and any loose debris.
- Rust Removal: This is a crucial step.
- Light Rust: For minor surface rust, you can often use steel wool (medium or fine grit) or a wire brush to scrub it away.
- Heavy Rust: For more extensive rust, you might need a rust remover product or a coarser wire brush attachment for a drill. Always wear protective gloves and eyewear when using rust removers.
- After Rust Removal: Wipe down the area with a clean, damp cloth to remove any residue, then dry it completely.
Addressing Scratches and Dents
- Minor Scratches: For light scratches, a bit of automotive rubbing compound or metal polish might help buff them out.
- Deeper Scratches/Dents: These can be filled with a metal putty or epoxy filler designed for outdoor use. Apply the filler according to the product instructions, allow it to cure fully, then sand it smooth with fine-grit sandpaper to match the surrounding surface.
Painting Metal Furniture
Painting is the best way to protect metal and give it a fresh new look.
Surface Preparation
- Sanding: After cleaning and rust removal, lightly sand the entire piece of furniture with fine-grit sandpaper (180-220 grit). This creates a surface that the new paint can adhere to. If there was old paint, and it’s peeling, you’ll need to remove it using a wire brush or sandpaper until you reach bare metal.
- Priming: Apply a high-quality metal primer, preferably one that is rust-inhibiting. Apply thin, even coats and allow each coat to dry completely according to the manufacturer’s instructions. Primer is essential for paint adhesion and preventing future rust.
Painting Techniques
- Spray Paint: For a smooth, even finish, spray paint is often the easiest option. Choose an outdoor-rated spray paint specifically designed for metal. Apply multiple thin coats rather than one thick coat to avoid drips and runs. Hold the can about 10-12 inches away from the surface and use a steady back-and-forth motion.
- Brush or Roller: If you prefer brush or roller application, use an exterior-grade metal paint. Apply thin, even coats with a good quality brush or a foam roller.
Finishing Touches
- Clear Coat: Once the paint is completely dry (allow at least 24 hours), you can apply a clear topcoat designed for outdoor metal to add an extra layer of protection against the elements and UV rays.
Restoring Wooden Outdoor Furniture
Wood furniture offers natural beauty but requires ongoing protection. Exposure to sun, rain, and temperature changes can cause it to fade, crack, and rot. Protect wood furniture by following these steps.
Cleaning and Mildew Removal
- Washing: Use a soft brush and a mild soap solution (like dish soap and water) to clean the wood.
- Mildew Treatment: For mildew, a solution of 1 part bleach to 3 parts water can be effective. Apply it with a sponge or cloth, let it sit for a few minutes, then scrub gently with a brush.
- Rinsing: Rinse thoroughly with clean water.
- Drying: Let the wood dry completely in the sun or a well-ventilated area.
Repairing Wood Damage
Loose Joints and Cracks
- Securing Loose Joints: If parts of your wooden furniture are loose, you might need to re-glue them. Disassemble the loose parts if possible. Clean off any old glue. Apply a waterproof wood glue to both surfaces and clamp them together firmly. Wipe away any excess glue with a damp cloth. Allow it to dry completely according to the glue manufacturer’s instructions.
- Filling Cracks: Small cracks can be filled with a waterproof wood filler. Apply the filler with a putty knife, pressing it into the crack. Smooth the surface. Once dry, sand it smooth. For larger cracks or gaps, you may need to use wood epoxy.
Sanding for Refinishing
- Surface Preparation: To get a smooth, even finish, sanding is essential. Start with a medium-grit sandpaper (around 100-120 grit) to remove old finishes, dirt, and minor imperfections.
- Smoothing: Follow up with finer grit sandpaper (180-220 grit) for a smooth surface. Sand in the direction of the wood grain. Always wear a dust mask.
Refinishing Wood Furniture
Staining
- Application: Apply wood stain with a brush or cloth, working it into the wood grain. Wipe off any excess stain with a clean cloth after a few minutes, as per the stain manufacturer’s instructions.
- Multiple Coats: You can apply multiple coats of stain for a deeper color, allowing each coat to dry.
Sealing and Protecting
- Exterior Varnish or Sealant: This is the most critical step for protecting wood furniture. Use a high-quality exterior-grade varnish, polyurethane, or sealant designed for outdoor use.
- Application: Apply several thin, even coats. Use a good quality paintbrush and work with the wood grain. Allow each coat to dry completely and lightly sand with very fine-grit sandpaper (220-320 grit) between coats for a smoother finish.
- Frequency: Reapply sealant every one to two years, or as needed, to maintain protection.
Addressing Fabric and Cushion Issues
Worn-out, faded, or ripped cushions can make even the sturkiest furniture look uninviting. Replace cushions or refresh them to give your seating a new lease on life.
Cleaning Cushions
- Check the Label: Always check the care label on your cushions. Some may be machine washable, while others require spot cleaning.
- Spot Cleaning: For most outdoor cushions, spot cleaning is the way to go. Mix a mild soap solution with water. Dampen a cloth or sponge, wring it out well, and gently blot the stained area.
- Stubborn Stains: For tougher stains like mildew or bird droppings, a solution of water and white vinegar or a specialized outdoor fabric cleaner can be used. Test any cleaner on an inconspicuous area first.
- Rinsing: Wipe down the cleaned area with a clean cloth dampened with plain water.
- Drying: Allow cushions to air dry completely. It’s best to do this on a sunny, breezy day. Avoid sitting on them until they are fully dry to prevent mold and mildew.
Replacing Cushion Covers
Many outdoor cushions have removable covers that can be washed or replaced.
- Measure: If you need to buy new covers, carefully measure your existing cushion foam inserts. Note the length, width, and thickness.
- Fabric Choice: Select outdoor-specific fabrics that are fade-resistant, water-repellent, and mildew-resistant. Acrylics and polyester blends are good choices.
- DIY Covers: If you’re handy with a sewing machine, you can create your own custom cushion covers. Ensure you use outdoor-rated thread and zippers.
Replacing Cushion Inserts
If the foam inside your cushions has deteriorated, it’s time for new inserts.
- Measure: Accurately measure your existing cushion inserts.
- Foam Type: Choose high-density outdoor foam that will retain its shape and provide good support.
- DIY Inserts: You can buy foam by the yard and cut it to size. For a professional finish, you can wrap the foam in a thin layer of polyester batting before encasing it in the fabric cover.
Reassembling and Securing Patio Sets
Sometimes, furniture can become disassembled or loose due to weather or general use. Learning how to reassemble patio set components and secure loose furniture is a valuable skill.
Identifying the Problem
- Loose Hardware: Check all bolts, screws, nuts, and washers. Are they tight?
- Wobbly Legs: Are any legs uneven or loose?
- Separated Joints: Have any parts come apart?
Tightening and Securing
- Tools: You’ll likely need a wrench, pliers, screwdrivers (Phillips and flathead), and possibly an Allen key set.
- Tightening: Go through each piece of furniture and systematically tighten all accessible hardware. Don’t overtighten, as this can strip screws or damage the material.
- Lock Washers: If you have bolts and nuts, consider using lock washers. These help prevent the nuts from loosening over time due to vibration or expansion/contraction from temperature changes.
- Threadlocker: For bolts that tend to loosen frequently, a drop of liquid threadlocker (e.g., Loctite) can be very effective.
Reassembling Disassembled Furniture
- Instruction Manuals: If you still have the original instruction manual, refer to it.
- Online Resources: Many manufacturers have assembly guides or videos available online. Search for your furniture model.
- Visual Inspection: If no instructions are available, examine the pieces carefully. Look for pre-drilled holes, slots, and connection points that indicate how they fit together.
- Gradual Assembly: Assemble the furniture piece by piece, step by step. Start with the base or frame and gradually add other components.
- Assistance: For larger or heavier pieces, it’s always a good idea to have a second person to help hold parts in place during assembly.
Dealing with Wobbly Furniture
- Check for Levelness: Ensure the furniture is on a level surface.
- Adjustable Feet: Some furniture has adjustable feet. Try to level the furniture by turning these feet.
- Shims: If adjustable feet aren’t an option, you can use small, durable shims (made of plastic or rubber) under the shorter legs to stabilize the furniture.
- Reinforce Joints: If wobbling is due to loose joints, re-glue or re-tighten as described above.
General Maintenance Tips for Longevity
Regular maintenance is key to keeping your lawn furniture in great condition and extending its lifespan.
- Regular Cleaning: Clean your furniture at least once a season, or more often if it gets dirty.
- Storage: If possible, store cushions indoors during inclement weather or the off-season to protect them from moisture and UV damage. Wood and metal furniture can also benefit from being covered or stored in a shed or garage during harsh winter months.
- Check Hardware: Periodically check all screws, bolts, and fasteners to ensure they are tight.
- Inspect for Damage: Regularly look for signs of rust, rot, loose joints, or fabric tears, and address them promptly.
- Protect Wood: Reapply protective finishes to wood furniture annually or as needed.
By following these detailed steps, you can effectively repair lawn chairs, restore patio furniture, mend garden seating, fix outdoor tables, refinish wicker furniture, replace cushions, clean metal furniture, protect wood furniture, reassemble patio set, and secure loose furniture. Enjoying your refreshed outdoor space is now within reach!
Frequently Asked Questions (FAQ)
Q1: What is the best way to remove rust from metal patio furniture?
A1: For light rust, steel wool or a wire brush works well. For heavier rust, use a rust remover product or a wire brush attachment on a drill. Always wear protective gear and clean the area thoroughly afterward.
Q2: Can I paint over old, chipped paint on my metal furniture?
A2: It’s best to remove loose or peeling paint first. Sand down the entire surface to ensure good adhesion for the new paint. Then, apply a metal primer before painting.
Q3: How often should I reapply sealant to my wood lawn furniture?
A3: It’s generally recommended to reapply a protective sealant or varnish to wood furniture every one to two years, or whenever the wood starts to look dull or dry.
Q4: What kind of fabric is best for outdoor cushions?
A4: Look for fabrics specifically designed for outdoor use. These are typically made from acrylic or polyester blends that are fade-resistant, water-repellent, and mildew-resistant.
Q5: My wicker chair is wobbly. How can I fix it?
A5: First, check if all the joints and screws are tight. If the wobbling persists, you may need to re-glue any loose rattan joints with a strong wood glue. For synthetic wicker, check for loose fasteners or consider if the frame itself is compromised.
Q6: How do I clean mildew off my outdoor furniture cushions?
A6: A solution of equal parts water and white vinegar, or a diluted mild soap and water mixture, often works well. You can also use a specialized outdoor fabric cleaner. Always test the cleaner on an inconspicuous area first. Ensure cushions are completely dry before storing or using.
Q7: What can I do if my patio table has a deep scratch?
A7: For metal tables, you can use a metal putty or epoxy filler. For wood tables, use a waterproof wood filler. Apply the filler, let it cure, then sand it smooth to match the surrounding surface. You may need to repaint or re-stain the area.
Q8: Is it better to spray paint or brush paint metal furniture?
A8: Spray paint usually provides a smoother, more even finish and is often easier for beginners. However, brush or roller application is also effective if done carefully with the right type of paint and tools.
Q9: How can I prevent my furniture from becoming loose?
A9: Regularly check and tighten all hardware. Using lock washers can help prevent nuts and bolts from loosening over time due to movement or temperature changes.
Q10: What’s the best way to refinish wicker furniture?
A10: For natural wicker, clean it thoroughly, repair any broken strands with glue, and then lightly sand if needed. Apply stain or paint in thin coats, allowing each to dry. Finish with an outdoor sealant for protection. For synthetic wicker, cleaning is usually sufficient, as refinishing is more difficult.