
Spring is coming! Getting your garden beds ready now means healthier plants and a bigger harvest later. What is the most important part of prepping garden beds? It’s preparing the soil. Can you start prepping your beds before the last frost? Yes, as long as the soil isn’t frozen or waterlogged. Who is prepping garden beds for? Anyone who wants a beautiful and productive garden.
This guide will walk you through everything you need to do to get your garden beds in top shape for the growing season. From cleaning up last year’s mess to giving your soil a nutrient boost, we’ll cover it all.
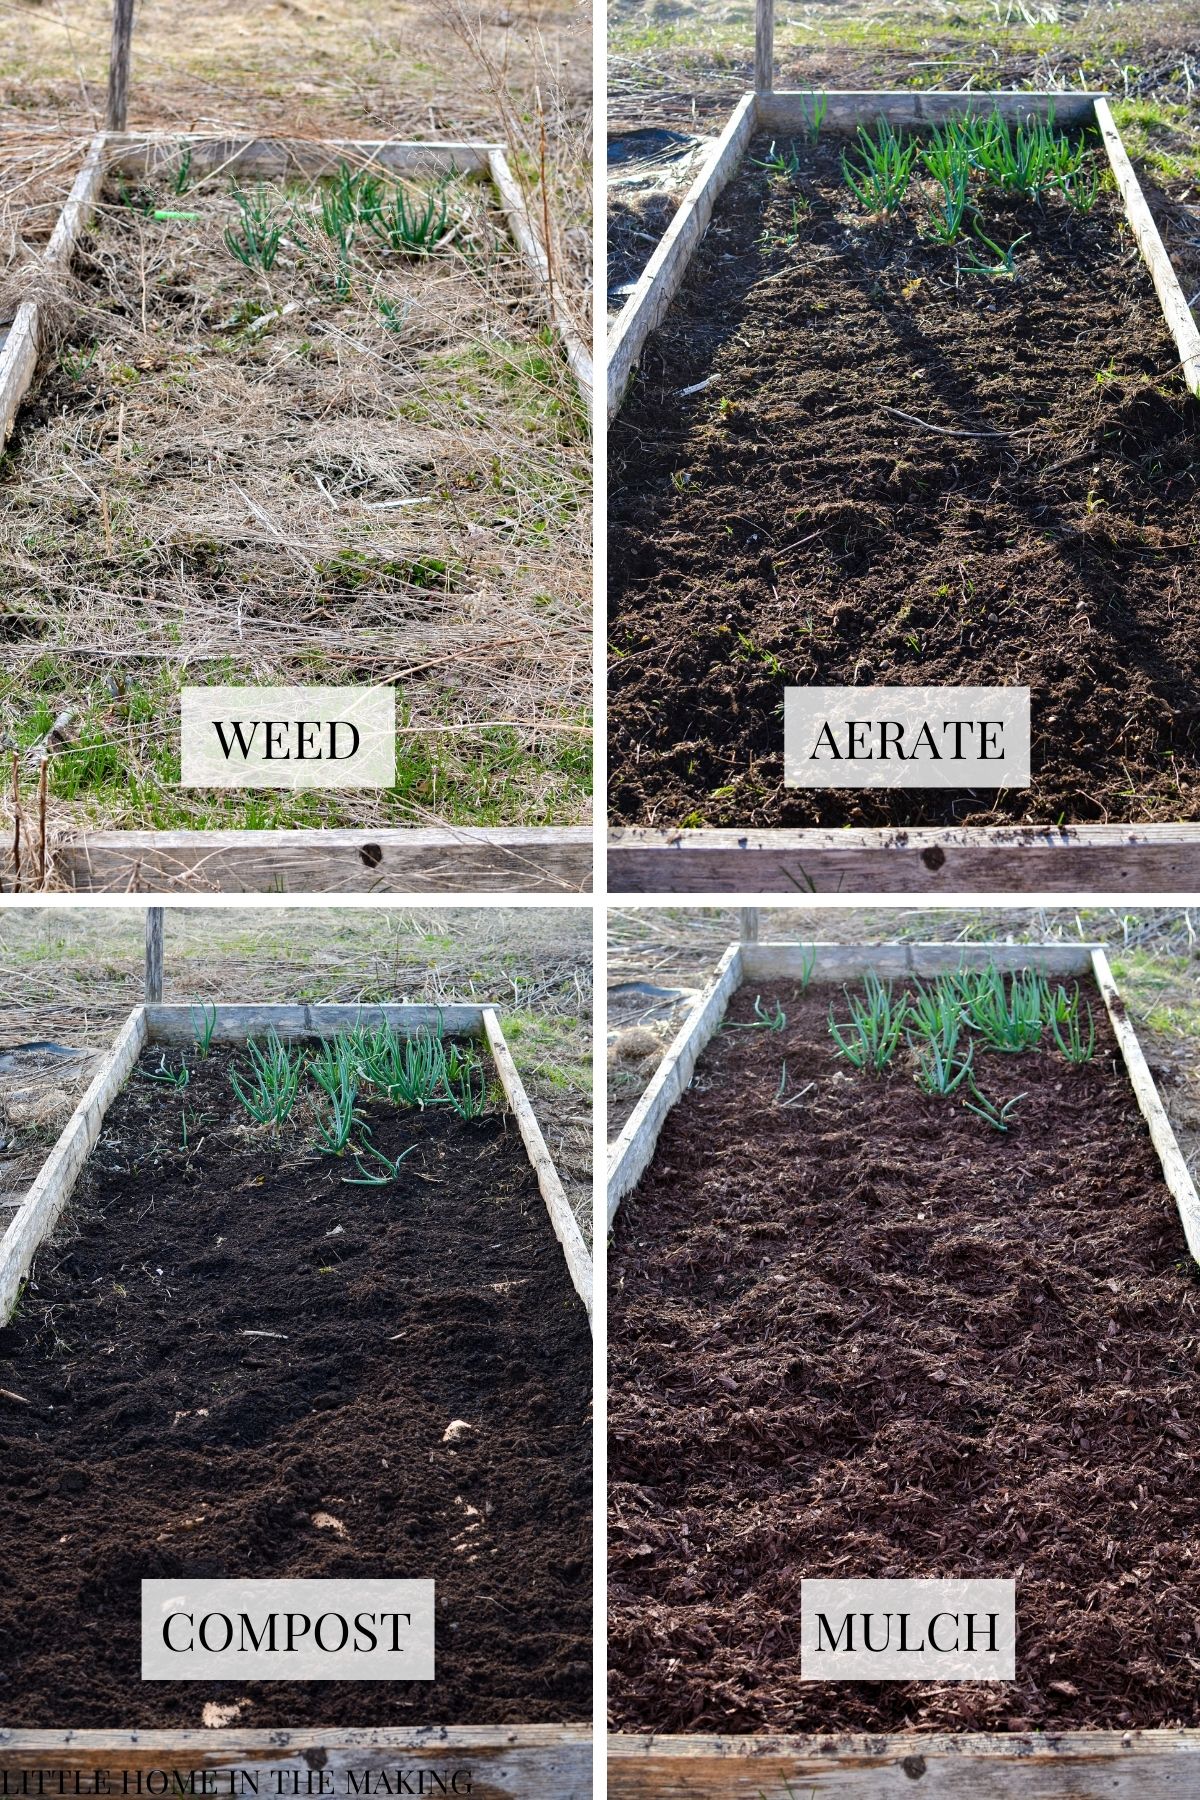
Image Source: www.littlehomeinthemaking.com
Clearing the Canvas: Tackling Winter Debris
Before you can build a great garden, you need to clear the slate. Winter can leave behind a lot of mess, and it’s crucial to get rid of it before you start working the soil.
Removing Old Plants and Debris
Last year’s spent plants can harbor diseases and pests. It’s best to remove them entirely.
- Pull out dead plants: Gently pull up any dead annuals or vegetables. If they looked healthy last year, consider adding them to your compost pile. If they showed signs of disease, it’s safer to dispose of them in the trash to prevent problems from spreading.
- Clear fallen leaves: A thick layer of leaves can smother new growth and provide a home for slugs and snails. Rake them away. Smaller amounts can be excellent composting material.
- Remove weeds: Even though it’s early, some hardy weeds may have survived the winter. Pulling them now, when the soil is often moist and they are small, is much easier than dealing with them when they’re larger and have set seed.
Dealing with Mulch
If you mulched heavily for winter protection, now is the time to manage it.
- Push back mulch: For beds where you’ll be planting cool-season crops directly into the soil, push back the mulch a few inches from where you intend to plant. This allows the soil to warm up faster.
- Remove old mulch: If you used a biodegradable mulch like straw or shredded leaves and it has decomposed significantly, you can gently fork it into the soil as a soil amendment. If it’s still intact or looks a bit unsightly, you can remove it and add it to your compost.
Soil Assessment: What Your Garden Needs
Healthy soil is the foundation of a thriving garden. Before you start adding anything, it’s wise to assess what your soil currently has and what it might be lacking.
The Importance of Soil Testing
Soil testing is a game-changer for gardeners. It tells you the pH level and the nutrient content of your soil. This information helps you choose the right amendments and fertilizers, avoiding over- or under-fertilizing, which can harm your plants and the environment.
- When to test: Fall is often ideal, but winter or early spring testing is also perfectly fine.
- How to test: You can get a kit from your local garden center or send a sample to your local cooperative extension office. They often provide more detailed analysis and recommendations.
- What to look for: Pay attention to pH (most vegetables prefer slightly acidic to neutral, 6.0-7.0) and levels of key nutrients like nitrogen, phosphorus, and potassium.
Observing Your Soil
Even without a formal test, you can learn a lot by looking and feeling.
- Texture: Does it feel sandy, silty, or clay-like? Sandy soil drains quickly but doesn’t hold nutrients well. Clay soil holds moisture and nutrients but can become compacted. A good garden soil is often a loam, a balance of sand, silt, and clay.
- Color: Darker soil generally indicates more organic matter, which is a good sign.
- Drainage: After a rain, does water puddle for a long time, or does it drain away reasonably quickly? Poor drainage can be a sign of compaction or heavy clay.
Rejuvenating the Soil: Adding Essential Nutrients
Once you’ve cleared the beds and have a sense of your soil’s needs, it’s time to make it happy and healthy for the upcoming season.
The Magic of Composting
Composting is one of the best ways to improve soil structure, fertility, and water retention. Compost adds essential nutrients and beneficial microbes, creating a rich, living soil.
- Adding finished compost: Spread a 2-4 inch layer of finished compost over your garden beds. This can be done before or after digging or turning soil.
- Incorporating compost: Gently fork or till the compost into the top 6-8 inches of soil. This helps mix it in and starts the process of improving the soil structure.
The Role of Other Soil Amendments
Depending on your soil testing results and observations, you might need other soil amendments.
- Compost: As mentioned, compost is king for most gardens.
- Aged Manure: Well-rotted manure is another excellent source of nutrients and organic matter. Ensure it’s composted or aged, as fresh manure can burn plant roots due to its high nitrogen content.
- Peat Moss/Coco Coir: These can improve water retention and aeration, especially in sandy or clay soils. Peat moss is a sustainable choice, but coco coir is a more environmentally friendly alternative.
- Perlite/Vermiculite: These can improve drainage and aeration in heavy soils.
- Lime: If your soil is too acidic (low pH), lime can help raise the pH.
- Sulfur: If your soil is too alkaline (high pH), sulfur can help lower it.
Table 1: Common Soil Amendments and Their Benefits
| Amendment | Primary Benefits | When to Use |
|---|---|---|
| Compost | Improves soil structure, fertility, water retention | Always a good idea; broad application |
| Aged Manure | Adds nutrients and organic matter | If soil lacks fertility; ensure it’s well-composted |
| Peat Moss | Increases water retention, improves aeration | For sandy or clay soils needing better moisture/air |
| Coco Coir | Increases water retention, good aeration, sustainable | Alternative to peat moss for improving soil structure |
| Perlite | Improves drainage and aeration | For heavy clay soils that hold too much water |
| Vermiculite | Improves aeration, water retention, aeration | For heavy clay soils, can also help aerate sandy soils |
| Agricultural Lime | Raises soil pH (makes it less acidic) | If soil test shows low pH (acidic soil) |
| Garden Sulfur | Lowers soil pH (makes it less alkaline) | If soil test shows high pH (alkaline soil) |
Fertilizing for the Season Ahead
Fertilizing provides the specific nutrients your plants need to grow strong.
- Organic Fertilizers: These release nutrients slowly and improve soil health over time. Examples include bone meal, blood meal, fish emulsion, and alfalfa meal.
- Synthetic Fertilizers: These provide a quick nutrient boost but can sometimes lead to nutrient imbalances if not used carefully. They are often labeled with an N-P-K ratio (Nitrogen-Phosphorus-Potassium).
- Application: Follow the instructions on your chosen fertilizer. Many gardeners prefer to incorporate a balanced organic fertilizer when preparing beds, providing a steady supply of nutrients throughout the growing season.
Working the Soil: The Art of Digging and Aeration
How you physically work the soil can have a big impact on its health and your plants’ root development.
To Dig or Not to Dig: The No-Till Debate
The question of whether to dig or turn soil is a big one in gardening.
- Traditional Digging/Tilling: This involves using a spade or tiller to deeply turn and mix the soil.
- Pros: It effectively incorporates amendments, breaks up compacted soil, and kills existing weeds.
- Cons: It can disrupt the soil’s natural structure, harm beneficial microorganisms and earthworms, and bring dormant weed seeds to the surface.
- No-Till Gardening: This approach minimizes soil disturbance. Amendments are typically layered on top, and plants are sown or transplanted directly through them.
- Pros: Preserves soil structure, promotes healthy microbial life, reduces erosion, and can save time and effort.
- Cons: May require more patience for new beds, as incorporating amendments might take longer to break down and become available to plants.
Choosing your method depends on your soil type, your gardening philosophy, and the current condition of your beds. For established beds that have been gardened for a while, a lighter approach or no-till might be best. For heavily compacted or neglected soil, a more thorough digging might be necessary initially.
Aeration: Letting Your Soil Breathe
Aeration is crucial for healthy root growth. It ensures that air, water, and nutrients can penetrate the soil.
- Using a Garden Fork: A simple garden fork is an excellent tool for aeration. Push the fork deep into the soil and gently rock it back and forth to create air pockets. You don’t need to lift and turn the soil over completely; just creating openings is effective.
- Core Aerators: For very compacted lawns or garden areas, a core aerator can be used to pull out plugs of soil, leaving holes for air and water to penetrate.
- Adding Organic Matter: The best long-term solution for aeration is to consistently add organic matter like composting. As organic matter decomposes, it creates channels and improves the soil’s crumb structure.
Preparing Raised Beds: A Special Kind of Prep
Raised beds offer many advantages, including better drainage and easier access, but they still require proper preparation.
Filling Your Raised Beds
The “soil” in your raised beds is entirely up to you. This is your chance to create the perfect growing medium.
- The Lasagna Method (Layering): This is a fantastic way to fill raised beds using a variety of organic materials. Start with a base layer of coarse materials, then add layers of nitrogen-rich “greens” (like grass clippings or kitchen scraps) and carbon-rich “browns” (like shredded leaves or straw). Continue layering until the bed is almost full. Over time, these materials will decompose, creating rich soil.
- Using a Quality Soil Mix: You can also purchase or create a custom soil blend. A common and effective mix is:
- 40% high-quality topsoil
- 40% compost
- 10% peat moss or coco coir
- 10% perlite or vermiculite
Maintaining Raised Beds
- Top Up Annually: Even with the best filling methods, the soil level in raised beds will settle over time as organic matter decomposes. Add a fresh layer of compost each spring to replenish the nutrients and soil volume.
- Weeding: Weeds are generally less of a problem in raised beds due to the improved drainage and the fact that you control the soil you fill them with. However, weeds can still blow in or come with new plants. Regular weeding is still necessary.
Mulching for Protection and Growth
Once your beds are prepped and planted, mulching is a crucial step for success.
Why Mulch?
Mulching offers a protective blanket for your soil and plants throughout the growing season.
- Weed Suppression: A good layer of mulch blocks sunlight, preventing weed seeds from germinating.
- Moisture Retention: Mulch acts like a sponge, keeping the soil moist by reducing evaporation. This means less watering for you!
- Temperature Regulation: Mulch helps keep the soil cooler in summer and warmer in winter, protecting plant roots from extreme temperature fluctuations.
- Soil Improvement: Organic mulches will slowly break down, adding valuable nutrients and organic matter to your soil.
Types of Mulch
- Organic Mulches:
- Shredded Bark/Wood Chips: Durable and long-lasting.
- Straw: Excellent for vegetable gardens, especially for suppressing weeds and keeping fruits clean.
- Shredded Leaves: A readily available and effective mulch.
- Grass Clippings: Use in thin layers to avoid matting and anaerobic conditions.
- Compost: A fantastic mulch that also feeds the soil.
- Inorganic Mulches:
- Plastic Sheeting: Effective for weed suppression and warming the soil, but does not improve soil health.
- Gravel/Stone: Best for decorative purposes or specific rock garden environments.
Applying Mulch
- Depth: Apply a layer of mulch about 2-4 inches thick.
- Around Plants: Keep mulch a little away from the stems of plants to prevent rot and discourage pests.
The Final Polish: Getting Ready to Plant
With your beds prepped, amended, and mulched, you’re almost ready to plant!
Final Weeding Pass
Before you put seeds or seedlings in the ground, do one last sweep for any persistent weeds that may have popped up during the prep process.
Making Planting Holes
If you’ve added a thick layer of mulch, you’ll need to push it aside to create holes for planting seeds or transplanting seedlings.
Watering In
After planting, a gentle watering will help settle the soil around the roots and give your new plants a great start.
Frequently Asked Questions (FAQ)
Q1: When is the best time to start prepping garden beds for spring?
A1: The best time to start prepping garden beds for spring is after the soil has thawed and is no longer waterlogged. You can typically begin as soon as the ground is workable, which is often a few weeks before the last expected frost date, especially for hardy crops.
Q2: Can I skip soil testing and just add compost?
A2: While adding compost is almost always beneficial, skipping soil testing means you might be guessing about specific nutrient deficiencies or pH imbalances. This can lead to over-fertilizing or not providing the exact nutrients your plants need for optimal growth. A test gives you a more precise roadmap.
Q3: How deep should I dig or turn the soil?
A3: If you choose to dig, aim to incorporate amendments into the top 6 to 8 inches of soil. Avoid going too deep, as this can disrupt beneficial soil layers and organisms. For minimal disturbance gardening, you might only work the top few inches or rely on natural processes.
Q4: How much compost should I add to my garden beds?
A4: A general guideline is to add a 2 to 4-inch layer of compost over the surface of your beds and then gently fork it into the top 6 to 8 inches of soil. For raised beds, compost makes up a significant portion of the fill material.
Q5: What’s the difference between mulching and composting?
A5: Composting is the process of breaking down organic materials to create a nutrient-rich soil amendment. Mulching, on the other hand, is spreading a layer of material (which can be compost, straw, bark, etc.) on top of the soil surface to suppress weeds, retain moisture, and regulate temperature. Organic mulches will eventually decompose and contribute to the soil, similar to compost.
Q6: I have clay soil that drains poorly. What can I do?
A6: Clay soil benefits greatly from the addition of organic matter. Incorporating plenty of compost and aged manure will help break up the dense clay particles, improving drainage and aeration. Adding perlite or vermiculite can also help. Raised beds are also an excellent solution for poorly draining clay soil, as you can control the soil composition entirely.
Q7: Is it okay to add grass clippings as mulch?
A7: Yes, but it’s best to add grass clippings in thin layers (no more than an inch at a time). Thick layers can mat together, preventing air and water from reaching the soil and can lead to anaerobic decomposition, which smells bad and can harm plants. It’s also best to use clippings from lawns that haven’t been treated with herbicides.
By following these steps, you’ll be well on your way to a productive and beautiful garden. Happy prepping!