
What is plugging a lawn? Plugging a lawn refers to the process of creating small holes in your turf, which are then filled with soil, seed, or a combination of both. Can I plug my lawn to fix it? Yes, you absolutely can plug your lawn to fix it! It’s a highly effective method for addressing common lawn problems. Who is plugging a lawn for? Plugging a lawn is for anyone with a lawn that needs improvement, whether it’s due to thinning grass, bare patches, or general wear and tear.
A lush, green lawn is the envy of the neighborhood, but achieving and maintaining it can be a challenge. Many homeowners struggle with patchy areas, bare spots, and a generally uninspired look. If this sounds like your lawn, then learning how to plug a lawn might be the perfect solution you’ve been searching for. This comprehensive guide will walk you through every step, from identifying the problem to achieving a beautifully filled-in lawn. We’ll cover everything you need to know to tackle DIY lawn repair like a pro and transform your yard.
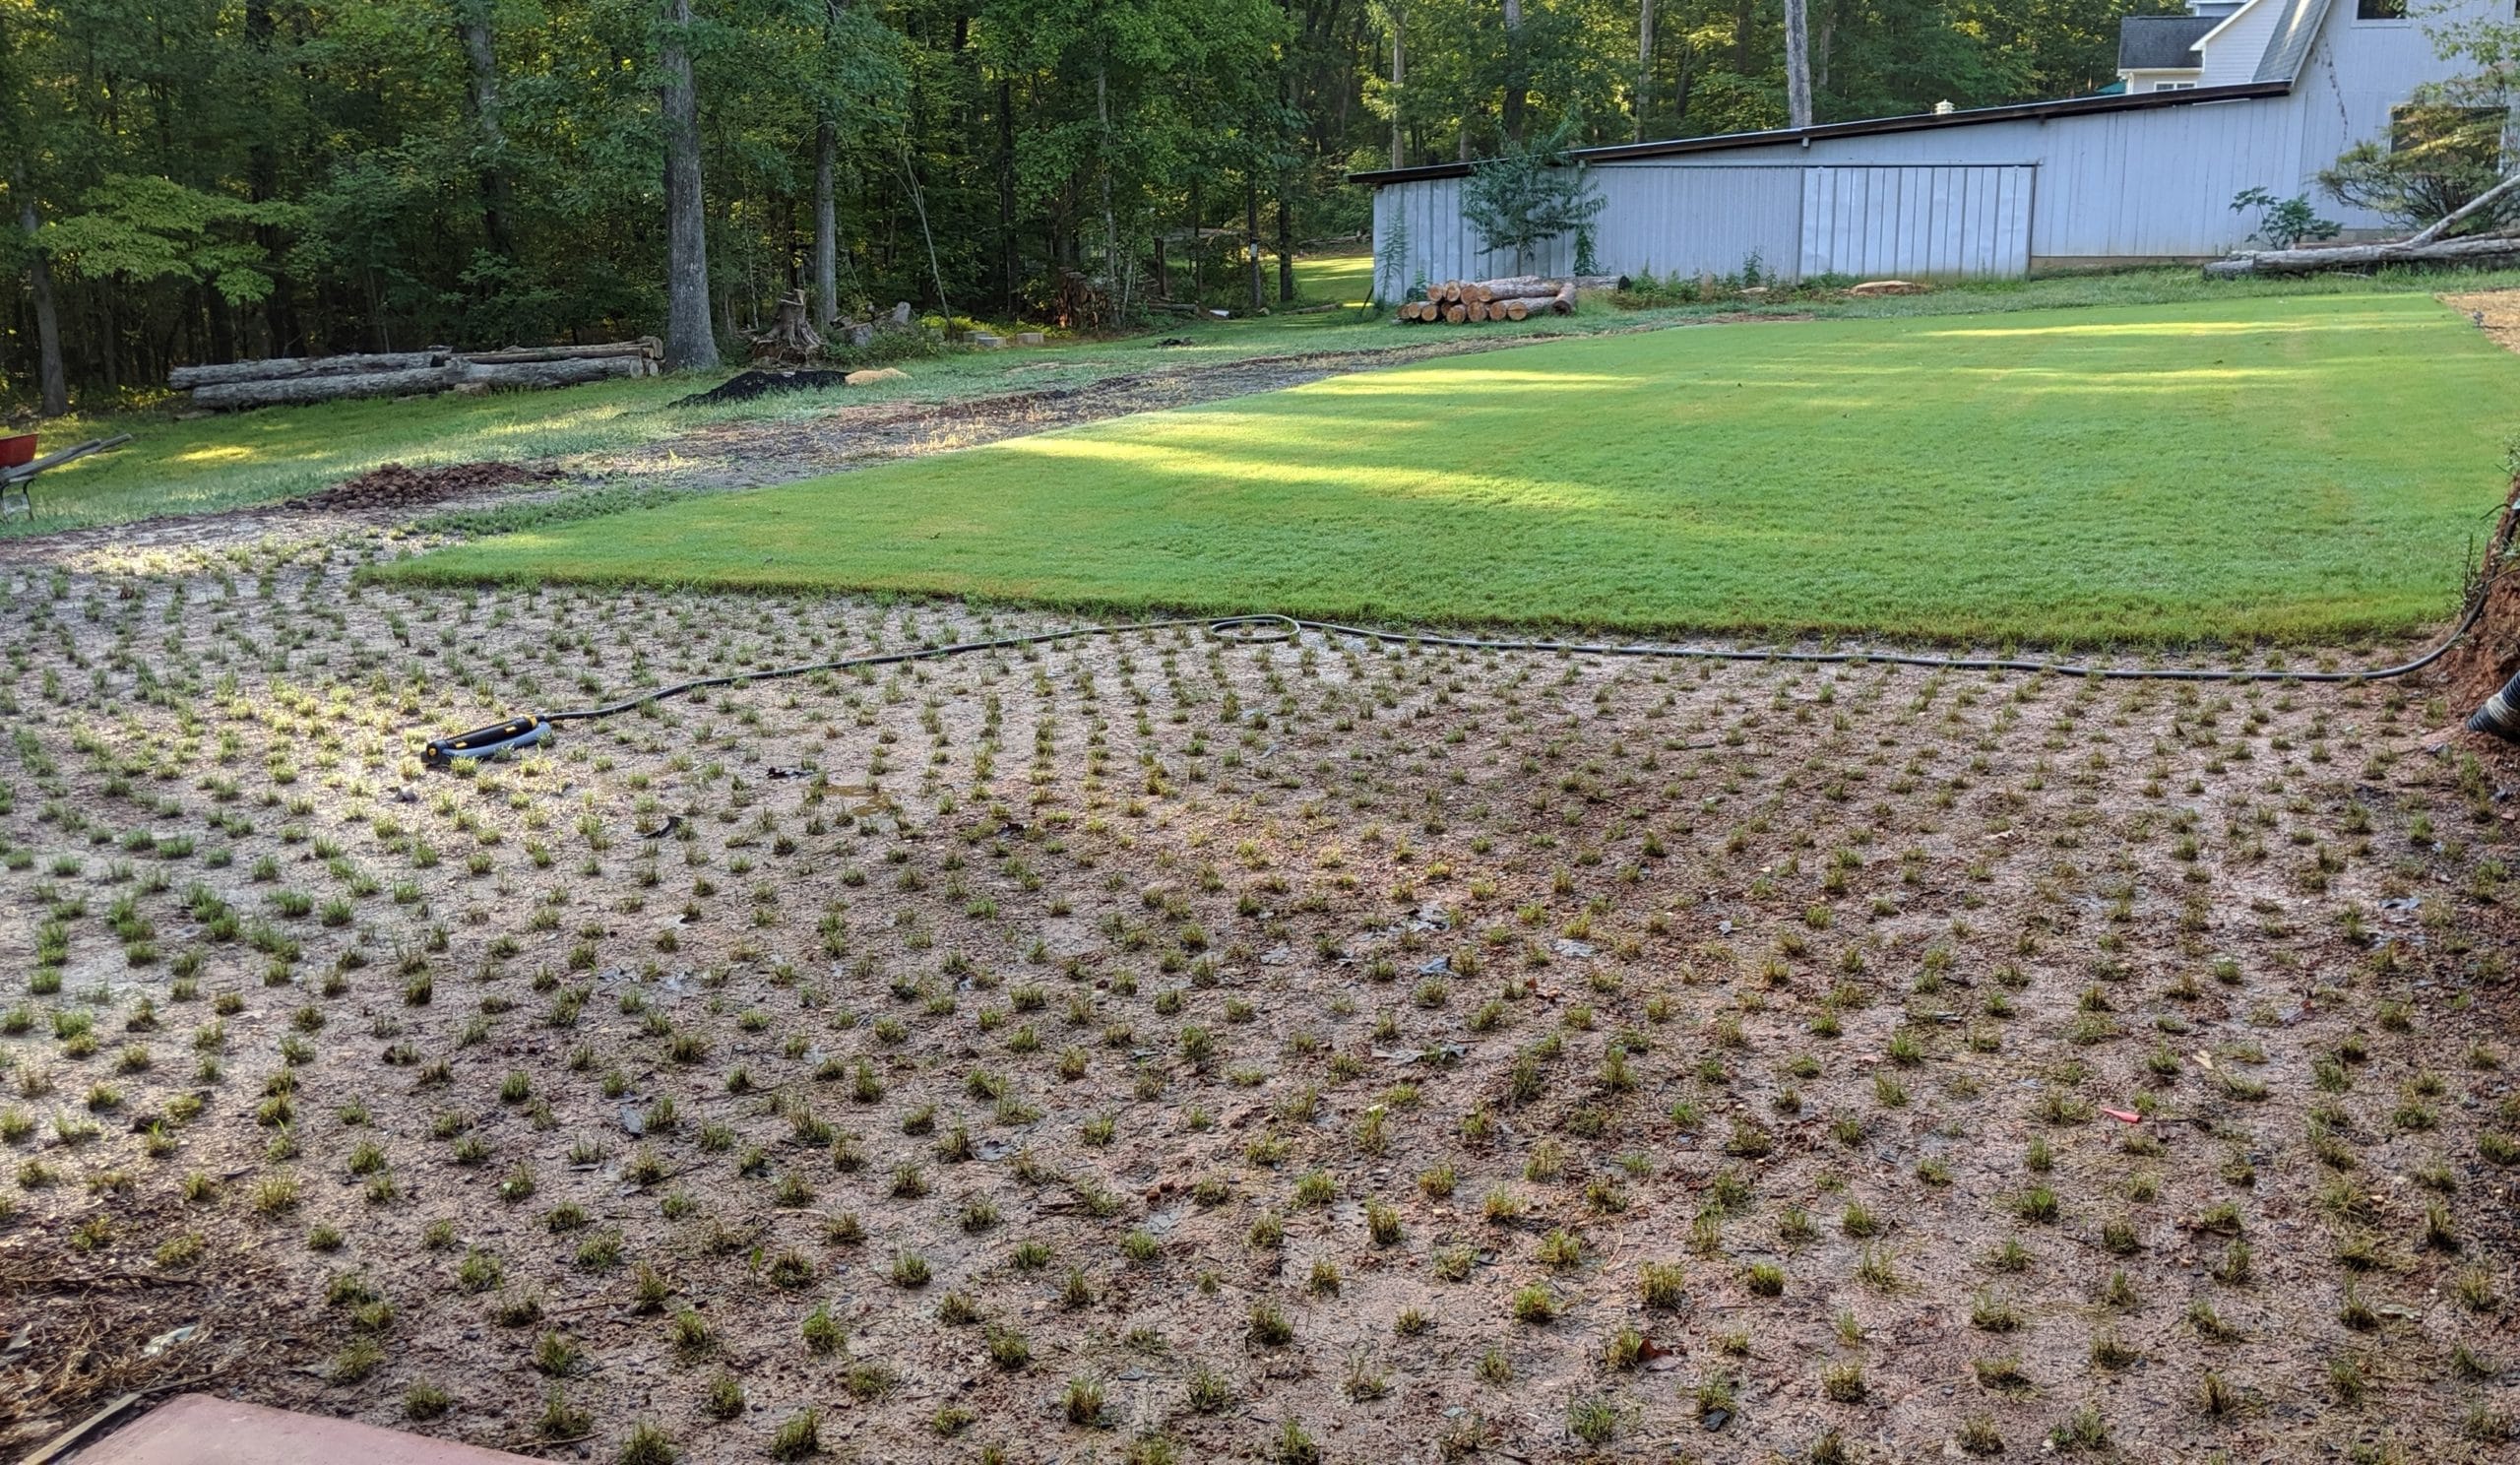
Image Source: proplugger.com
Why Plug Your Lawn?
Plugging your lawn isn’t just about filling in holes; it’s a multi-faceted approach to lawn care that offers significant benefits. It directly addresses issues that prevent your grass from thriving and creates an environment where new grass can flourish.
Combating Soil Compaction
One of the primary reasons to plug your lawn is to alleviate soil compaction. Over time, foot traffic, heavy machinery, and even just the natural settling of soil can lead to compaction. When soil becomes compacted, it squeezes out the air pockets. This makes it difficult for grass roots to grow deep and access vital water and nutrients. Plugging, especially when combined with lawn aeration, creates channels that allow air, water, and nutrients to penetrate the soil more effectively, reaching the root zone. This revitalizes the soil and encourages healthier grass growth.
Improving Water and Nutrient Penetration
Compacted soil acts like a hard barrier. When you water your lawn, the water sits on the surface, leading to runoff and wasted water. Nutrients applied to the surface also struggle to reach the roots. By creating holes, you provide direct pathways for water and fertilizer to seep into the soil. This means your grass gets the hydration and nourishment it needs, leading to stronger, more resilient turf.
Preparing for Overseeding
Plugging is an excellent preparation step for overseeding lawn areas. Overseeding involves spreading grass seed over an existing lawn to thicken it. However, simply throwing seed on top of dense, compacted turf is often ineffective. The seeds can’t make good contact with the soil and are easily washed away or eaten by birds. By plugging, you create ideal conditions for grass seed germination. The seeds fall into the holes, where they are protected and have direct contact with the soil, significantly increasing their chances of sprouting and growing into healthy new grass blades.
Filling Lawn Holes and Repairing Patches
The most obvious benefit of plugging is its ability to fill lawn holes and repair patchy lawn areas. Whether you have small bare spots from pet damage, insect activity, or just general wear, plugging allows you to introduce new grass seed directly into these troubled zones. This targeted approach is far more effective than simply scattering seed over the entire lawn. It ensures that the new grass has the best chance to establish itself and fill in those unsightly gaps, leading to a more uniform and attractive appearance.
Enhancing Root Development
Healthy grass starts with a strong root system. Plugged holes provide space for new grass roots to grow downwards without obstruction. This encourages deeper root development, making the grass more drought-tolerant and able to withstand stress from heat and foot traffic.
The Art of Plugging: Tools and Techniques
When you decide to plug your lawn, you need the right tools and a good understanding of the process. Fortunately, it’s a relatively straightforward DIY project.
Essential Tools for Plugging
Choosing the right tool is crucial for effective lawn plugging. The goal is to create a consistent plug of soil that can be easily filled.
- Manual Lawn Corer/Aerator: This is the most common and accessible tool for DIYers. It’s a handheld device with hollow tines. You step on it or twist it into the ground, and it extracts a core of soil. These are great for smaller to medium-sized lawns.
- Powered Aerator (Core Aerator): For larger lawns or if you plan to aerate and plug regularly, a powered aerator is a worthwhile investment or rental. These machines work much faster and can cover a significant area quickly. They extract multiple plugs at once.
- Spade or Trowel: For very small, isolated holes, you can manually dig out small plugs of soil with a spade or trowel, but this is much more time-consuming.
- Soil Amendments (Compost/Topsoil): You’ll need a good quality soil mix to fill the plugs. A blend of compost and topsoil is ideal.
- Grass Seed: Choose a grass seed that matches your existing lawn type for the best blend.
- Fertilizer: A starter fertilizer is beneficial to give the new grass seed a boost.
- Watering Can or Hose with Sprinkler: Essential for keeping the newly seeded areas moist.
Step-by-Step Plugging Process
Here’s how to plug your lawn effectively:
Step 1: Prepare the Lawn
- Mow the Lawn: Mow your grass to a height of about 2-3 inches. This makes it easier to work with and allows the plugs to be filled more effectively.
- Clear Debris: Remove any leaves, twigs, stones, or other debris from the lawn surface.
Step 2: Plug the Lawn
- Using a Manual Corer:
- Place the tines of the corer over the area you want to plug.
- Step firmly on the handle or push down with your weight to drive the tines into the soil.
- Twist the corer slightly and lift it straight up. This should extract a plug of soil.
- Space your plugs about 2-4 inches apart, depending on how thick you want the new grass to be. You don’t need to plug every square inch.
- Using a Powered Aerator:
- Follow the manufacturer’s instructions for operating the machine.
- Typically, you’ll drive the aerator over the lawn, and it will automatically extract plugs.
- Overlap your passes slightly to ensure even coverage.
Step 3: Address the Plugs
You have a few options for what to do with the soil cores extracted:
- Leave them on the lawn: For light aeration, you can leave the plugs on the surface. As they dry, they will break down and return nutrients to the soil. This is less about filling holes and more about aeration.
- Remove and discard: If you’re primarily focused on plugging and want a cleaner look, you can remove the plugs and discard them.
- Break them up and spread: You can break up the plugs with a rake or the back of a shovel and spread the loose soil over the lawn.
- Break them up and refill holes: This is the ideal method for lawn leveling and filling. After removing the plugs, use a rake to break them up and then spread this amended soil back into the holes.
Step 4: Fill the Holes
This is where you introduce new life into your lawn.
- Using a Rake: Use a stiff garden rake to gently spread the broken-up soil cores (if you chose that option) back into the holes.
- Adding Amendments: If you removed the plugs or if the holes are still deep, use a mixture of compost and topsoil to fill them. Aim to fill the holes so they are flush with the surrounding lawn surface. This is key for lawn leveling.
- Seeding: Sprinkle a good quality grass seed directly into the freshly filled holes and over any thin areas. Make sure the seed makes good contact with the soil.
- Fertilizing: Apply a starter fertilizer according to the package directions. This provides essential nutrients for young grass.
Step 5: Watering and Maintenance
- Water Gently: Water the entire lawn thoroughly but gently. You want to moisten the soil where the seeds are, but avoid washing them away.
- Keep Moist: For the next 2-3 weeks, keep the seeded areas consistently moist. Water lightly every day, or more frequently if the weather is hot and dry. Avoid letting the soil dry out completely, as this will kill the new seedlings.
- Mowing: Once the new grass reaches about 3-4 inches in height, you can begin mowing. However, wait until the new grass is well-established (at least 2-3 mows) before you mow the entire lawn at its regular height. Never cut more than one-third of the grass blade at a time.
When to Plug Your Lawn
Timing is everything in lawn care. Choosing the right season for plugging can significantly impact your success.
Best Times for Plugging
- Spring: Early to mid-spring is an excellent time for plugging, especially for cool-season grasses. The weather is usually mild, with consistent moisture, which is ideal for grass seed germination and establishment. This allows the new grass to grow strong before the heat of summer.
- Fall: Fall is arguably the best time for plugging, particularly for cool-season grasses. The soil is still warm, but the air temperatures are cooler, reducing stress on new seedlings. Fall also allows the grass to establish deep roots before winter, giving it a head start in the spring. Aim for late summer to early fall.
What to Avoid
- Summer Heat: Avoid plugging during the peak of summer heat. High temperatures and potential drought conditions will make it very difficult for new grass seed to germinate and survive.
- Frozen Ground: Do not plug when the ground is frozen, as you won’t be able to insert the tines, and the cold will prevent seed germination.
- When the Lawn is Too Wet or Too Dry: Very wet soil can be muddy and difficult to work with, potentially damaging the lawn. Very dry, hard soil will make it difficult to get the plugs out cleanly. Aim for soil that is moist but not saturated.
Addressing Specific Lawn Problems with Plugging
Plugging is a versatile technique that can solve a variety of common lawn issues.
Repairing Patchy Lawn Areas
Patchy lawns are often the result of soil compaction, poor drainage, or nutrient deficiencies. Plugging directly addresses these by opening up the soil and allowing new grass to fill in the gaps. By strategically plugging these thin areas and overseeding, you can create a much denser and more uniform lawn.
Filling Lawn Holes
Whether caused by pet urine, insect activity, or even moles, holes detract from your lawn’s appearance. Plugging is the ideal method to fill lawn holes effectively. By ensuring good soil contact and providing fresh seed, you encourage rapid regrowth in these damaged spots.
Improving Overall Lawn Density
Even if your lawn isn’t riddled with obvious holes, it might be thinning out. Overseeding lawn areas after plugging can dramatically improve overall density. The plugs create micro-sites for the new seeds, ensuring they take root and contribute to a thicker, more vibrant lawn. This is a great way to revitalize an older lawn.
Dealing with Soil Compaction
As mentioned, soil compaction is a silent killer of healthy lawns. Plugging, when done as part of a lawn aeration process, is a direct remedy. The holes created allow air and water to reach the root zone, breaking down the compaction and encouraging stronger root growth.
Advanced Plugging Techniques and Considerations
For those who want to take their lawn care to the next level, there are a few advanced considerations.
The Best Lawn Filler
The “best lawn filler” isn’t just about the seed; it’s about the entire process. A good filler includes:
- High-Quality Seed: Choose a blend that matches your existing grass type and is suited to your climate. Look for seeds that are known for disease resistance and drought tolerance.
- Nutrient-Rich Soil Amendment: A blend of compost and high-quality topsoil provides essential organic matter and nutrients that promote healthy grass seed germination and early growth.
- Starter Fertilizer: This contains phosphorus, which is crucial for root development.
Plugging for Overseeding Success
To maximize your overseeding lawn efforts, combine it with plugging. The plugs ensure that the seed makes direct contact with the soil, which is essential for germination. Think of the plugs as tiny seedbeds.
Lawn Leveling and Plugging
If your lawn has minor dips and unevenness, plugging can be part of a lawn leveling strategy. By filling the plugged areas with a good soil mix and encouraging grass growth, you can gradually raise low spots. For significant leveling, you might need to apply a layer of topsoil over the entire lawn, but plugging is excellent for minor imperfections.
Plug Spacing and Density
- For General Aeration and Overseeding: Spacing plugs 2-4 inches apart is usually sufficient. This allows for good air and water penetration and provides ample spots for new seed to establish.
- For Targeted Patch Repair: If you have specific bare spots, you can concentrate your plugging efforts in those areas, spacing the plugs closer together (1-2 inches) for quicker coverage.
Troubleshooting Common Plugging Issues
Even with the best intentions, you might encounter a few hiccups.
Plugs Not Coming Out Cleanly
- Cause: Soil is too wet, or the tines are dull.
- Solution: Wait for the soil to dry slightly. If using a manual corer, consider sharpening the tines or renting a powered aerator with sharper tines.
Seed Not Germinating
- Cause: Lack of moisture, poor seed-to-soil contact, or planting at the wrong time.
- Solution: Ensure the seeded areas remain consistently moist. Double-check that seeds have good contact with the soil. Re-evaluate your planting time.
New Grass Not Growing Strongly
- Cause: Nutrient deficiency, compacted soil that wasn’t adequately addressed, or incorrect grass type.
- Solution: Apply a balanced lawn fertilizer or a starter fertilizer. If compaction is still an issue, consider a second round of aeration. Ensure you’re using the correct grass seed for your region.
Maintenance After Plugging
Once you’ve plugged and seeded, continued care is vital.
Watering Regimen
- Initial Phase (2-3 weeks): Keep the seeded areas consistently moist. Lightly water daily, or more often in hot weather.
- Establishment Phase: Once the new grass is growing well, gradually reduce watering frequency but increase the amount each time. Aim for deep watering less often to encourage deep root growth.
Mowing Practices
- First Mow: Wait until new grass is about 3-4 inches tall. Mow at a higher setting than usual.
- Regular Mowing: Once established, maintain your lawn at the recommended height for your grass type. Avoid cutting off more than one-third of the blade in a single mowing. Keep mower blades sharp to prevent tearing.
Fertilization
- After the new grass has been mowed a couple of times, you can apply a balanced lawn fertilizer to support continued growth. Follow product instructions carefully.
Frequently Asked Questions (FAQ)
Q1: How often should I plug my lawn?
A1: For general lawn health and to combat soil compaction, plugging or aerating once a year is often sufficient, typically in the fall or spring. For targeted DIY lawn repair or to repair patchy lawn areas, you can plug as needed.
Q2: Can I plug my lawn with Kikuyu grass or other warm-season grasses?
A2: Yes, plugging is effective for both cool-season and warm-season grasses. The best time for plugging warm-season grasses is late spring or early summer when they are actively growing.
Q3: What is the difference between plugging and spiking the lawn?
A3: Spiking involves pushing solid tines into the soil, creating narrow holes. Plugging uses hollow tines to extract cores of soil. Plugging is generally more effective for lawn leveling, repair patchy lawn areas, and for preparing for overseeding lawn, as it removes the compacted soil and creates a better environment for grass seed germination.
Q4: Is plugging the same as lawn aeration?
A4: Plugging is a method of lawn aeration. Lawn aeration is the general process of creating holes in the soil to relieve compaction and improve air, water, and nutrient flow. Core aeration, which involves plugging, is one of the most effective forms of aeration.
Q5: What is the best lawn filler for large bare patches?
A5: For large bare patches, the best lawn filler involves plugging, then filling the holes with a high-quality soil/compost mix, followed by seeding with a good grass seed blend. Applying a starter fertilizer is also recommended. You might need to repeat this process for stubborn patches.
Q6: My lawn has mole tunnels. Can plugging help?
A6: Plugging can help to fill lawn holes created by moles, but it won’t solve the underlying mole problem. After filling the holes with seed and soil, you’ll need to address the moles themselves to prevent future damage.
By following these detailed steps, you can effectively plug your lawn, transforming it from a patchy, compacted mess into a lush, green carpet of healthy grass. This DIY lawn repair approach offers a cost-effective and rewarding way to enhance your home’s curb appeal and enjoyment.