
To measure a lawn mower blade, you typically need its blade length, blade width, and blade thickness. These measurements are crucial for ensuring the correct mower blade replacement and maintaining optimal cutting performance.
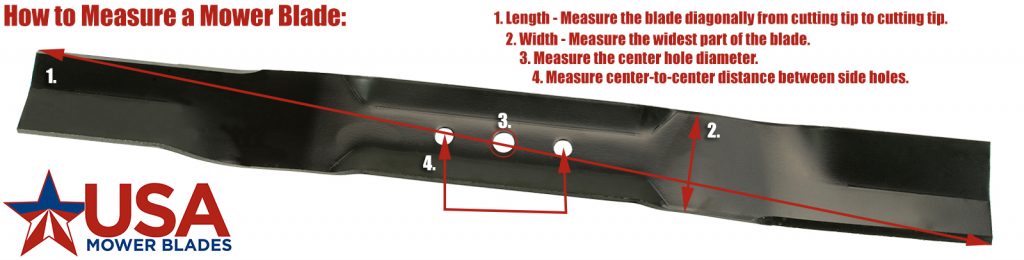
Image Source: usamowerblades.com
Why Measuring Your Lawn Mower Blade Matters
A well-maintained lawn starts with sharp, properly fitting mower blades. Measuring your lawn mower blade might seem straightforward, but it’s a critical step for several reasons:
- Optimal Cutting Performance: The correct blade length ensures the blade sweeps the entire cutting deck, preventing uncut strips and a ragged appearance.
- Mower Efficiency: A blade that’s too long or too short can cause the mower to work harder, leading to reduced fuel efficiency and potential engine strain.
- Safety: An improperly fitting blade can become loose or unbalanced, creating a dangerous situation.
- Deck Compatibility: Blades are designed for specific mower decks. Incorrect measurements can lead to the blade not fitting or causing damage to the deck.
- Preventing Damage: Using the wrong size or type of blade can damage your lawn, your mower, or both.
Deciphering Blade Measurements: What You Need to Know
When you need to replace a lawn mower blade, getting the measurements right is paramount. This isn’t just about length; other dimensions play a significant role in how well the blade cuts and fits your mower.
1. Blade Length: The Most Obvious Measurement
The blade length is the most commonly referenced measurement. It’s essentially the overall span of the blade from one cutting tip to the other.
How to Measure Blade Length:
- Straight Measurement: Lay the blade flat on a hard surface. Measure the distance from the very tip of one cutting edge to the very tip of the other cutting edge. Do not measure along the curve.
- Consider Overlap (for Mulching Blades): Some mulching blades have slightly curved ends. Even with this curve, you measure the straight-line distance between the tips.
Table: Typical Blade Length Ranges by Mower Type
| Mower Type | Typical Blade Length (inches) |
|---|---|
| Residential Push Mower | 18 – 22 |
| Residential Riding Mower | 30 – 61 |
| Commercial Zero-Turn | 21 – 72 |
| Tractor Mowers | 42 – 60 |
Important Note: Always measure your old blade directly if possible. Online specifications can sometimes be approximations.
2. Blade Width: Affecting Cut Quality and Airflow
The blade width refers to the dimension of the blade from the cutting edge to the trailing edge. This measurement influences how effectively the blade lifts grass and directs clippings.
How to Measure Blade Width:
- Perpendicular Measurement: With the blade lying flat, measure the distance from the cutting edge straight across to the opposite (trailing) edge.
- Consistency: Ensure you are measuring at a consistent point along the blade, usually near the center.
Why Width Matters: A wider blade can create more lift and suction, which is beneficial for standing grass. However, a blade that’s too wide might not fit the deck or could cause excessive drag.
3. Blade Thickness: Durability and Strength
Blade thickness is a measure of how substantial the blade material is. This directly impacts the blade’s durability, its ability to withstand impacts, and its cutting power.
How to Measure Blade Thickness:
- Gauge Measurement: The most accurate way is to use a caliper or a ruler with fine markings. Measure the thickness of the blade material itself, not including any attached components like anti-scalp “skids” or fins.
- Location: Measure at a consistent point, typically near the center of the blade or along the main body.
Implications of Thickness: Thicker blades are generally stronger and last longer, especially in tough conditions with rocks or debris. However, they can be heavier, potentially adding a slight load to the mower’s engine.
4. Blade Diameter (Center Hole): The Mounting Point
While not a measurement of the blade’s cutting span, the blade diameter often refers to the size of the center hole through which the blade is mounted to the mower’s spindle. This is critical for ensuring the blade attaches securely.
How to Measure the Center Hole Diameter:
- Direct Measurement: Use a caliper or a ruler to measure the diameter of the circular hole in the center of the blade.
- Star or Splined Holes: Many blades have center holes that are not perfectly round. These can be star-shaped, have three or five points, or be splined. In these cases, you measure the diameter of the circle that would perfectly enclose the star or spline pattern. Alternatively, you’ll need to identify the specific pattern (e.g., 5-point star, 6-point star) and match it to the replacement blade.
Matching the Center Hole: The center hole must match the mower’s spindle bolt and any adapter or washer used. A mismatch here means the blade won’t mount correctly.
Beyond the Basic Dimensions: Other Crucial Factors
While length, width, and thickness are key physical measurements, several other factors determine the best fit and performance for your lawn mower blade.
5. Blade Types: More Than Just Size
Different blade types are designed for different cutting functions. Knowing these can help you choose the right blade even before you measure your old one.
- Standard/Flat Blades: These are common for general mowing. They lift grass, cut it, and discharge it out the side.
- Mulching Blades: These blades are designed to cut grass multiple times, chopping it into fine pieces that fall back into the lawn as fertilizer. They often have a curved shape and sometimes “teeth” or fins on the cutting edge.
- High-Lift Blades: These blades have more aggressive upwardly curved ends (like wings). They create strong suction, lifting the grass high for a clean cut and effectively bagging clippings. They are ideal for tall grass or when bagging.
- Low-Lift Blades: These have less aggressive curves. They are better for sandy soil or conditions where a lot of suction could cause scalping or dig into the ground.
When to Choose a Different Type: If you’re switching from side-discharge to mulching, for example, you’ll need to ensure the new blade is specifically designed for mulching.
6. Blade Sharpening: Maintaining the Edge
While not a measurement of the blade itself, blade sharpening is directly related to its performance. A dull blade tears grass rather than cutting it, leading to brown tips and a generally unhealthy lawn.
- Angle of Sharpening: Most mower blades are sharpened to an angle of around 30-45 degrees. You don’t need to measure this precisely for a replacement, but it’s good to know that a sharp blade has a consistent bevel.
- Frequency: Sharpen blades at least once or twice a season, or more often if you mow frequently or encounter rough terrain.
7. Blade Balance: Essential for Smooth Operation
Blade balance is critical. Blades spin at very high speeds, and if one side is heavier than the other, it creates vibration. This vibration can:
- Damage the mower’s engine and bearings.
- Cause discomfort to the operator.
- Lead to uneven cutting.
Checking for Blade Balance:
- Center Hole Method: A simple way to check balance is to place the blade on a thin, pointed object inserted through the center hole (like a screwdriver shaft or even a nail). If one end consistently drops lower than the other, the blade is unbalanced.
- Shop Balance: Professional shops have specialized equipment to precisely balance blades.
Replacement Blade Balance: Most new replacement blades are pre-balanced. If you sharpen your existing blades, always check for balance afterward and grind a small amount of metal from the heavier side until it balances.
8. Blade Tip Speed: The Cutting Power
Blade tip speed is the speed at which the very end of the blade is moving. It’s calculated based on the engine’s revolutions per minute (RPM) and the blade’s length.
- Formula: Tip Speed (feet per minute) = Blade Length (inches) × RPM × 0.01745 (conversion factor)
- Importance: A higher tip speed means faster, cleaner cuts. Manufacturers design their mowers and blades to achieve optimal tip speeds for their intended use.
Impact on Measurement: While you don’t measure tip speed directly, selecting the correct blade length for your mower’s specifications ensures it operates at its intended tip speed for efficient cutting. Using a blade that’s too long or too short will alter this.
9. Blade Bolt Size: The Fastener
The blade bolt size refers to the diameter and thread pitch of the bolt that secures the blade to the mower spindle. This is a critical measurement for proper installation.
How to Measure Blade Bolt Size:
- Use a Thread Gauge or Caliper: If you have a caliper, you can measure the bolt diameter. For thread pitch, a thread gauge is the most accurate tool.
- Match to Existing Bolt: The safest bet is to remove the bolt from your old blade and take it to a hardware store to match its size and thread. Common sizes include 1/2-inch, 7/16-inch, or metric equivalents.
- Washer Identification: Note the size and type of washers used with the bolt, as these are also important for secure mounting.
Practical Steps for Measuring Your Lawn Mower Blade
Now that you know what to measure and why, let’s walk through the process step-by-step.
Step 1: Safety First!
Before you do anything, ensure your mower is completely safe to work on.
- Disconnect Spark Plug: This is the most crucial step to prevent accidental engine starts. Remove the spark plug wire from the spark plug.
- Chock Wheels: If working on a wheeled mower, ensure it won’t roll by engaging the parking brake or chocking the wheels.
- Wear Gloves: Mower blades are sharp, even when dull. Wear sturdy work gloves to protect your hands.
- Eye Protection: Always wear safety glasses to protect your eyes from debris.
Step 2: Access the Blade
You’ll need to get to the underside of the mower deck to remove the blade.
- Tilt the Mower: For most walk-behind mowers, tilting the mower onto its side (handle side up is usually best to keep oil and gas from leaking into the wrong places) provides access to the blade. Check your owner’s manual for the recommended tilting procedure.
- Lift the Mower: For riding mowers, you might need to use a mower lift or jack to safely raise the deck or the entire mower.
Step 3: Remove the Blade
This is where you’ll need a socket wrench or a breaker bar.
- Locate the Blade Bolt: The blade is held in place by a large bolt in the center.
- Determine Bolt Direction: Most blade bolts are reverse-threaded (left-hand thread), meaning you turn them clockwise to loosen. However, always confirm this by trying to turn it gently first.
- Secure the Blade: You’ll need to prevent the blade from turning while you loosen the bolt. You can use a block of wood wedged against the blade’s cutting edge to hold it in place, or use a specialized blade holding tool.
- Loosen the Bolt: Apply steady pressure with the correct size socket wrench or breaker bar to remove the bolt. Keep track of any washers or adapters that come off with the bolt.
- Remove the Blade: Carefully slide the blade off the spindle.
Step 4: Take Your Measurements
With the blade removed and safely in hand (wearing gloves!), you can now take your measurements.
- Blade Length: Lay the blade flat and measure from tip to tip (as described in section 1).
- Blade Width: Measure the distance from the cutting edge to the trailing edge (as described in section 2).
- Blade Thickness: Measure the thickness of the blade material (as described in section 3).
- Center Hole Diameter/Pattern: Measure the diameter of the center hole or identify its shape (star, splined) and size (as described in section 4).
- Bolt Size (Optional but Recommended): If you have a caliper or can remove the bolt, measure its diameter and thread pitch, or simply take the bolt with you for matching.
Step 5: Identify Blade Type and Features
- Look for Markings: Check the blade itself for any manufacturer part numbers or model numbers. These can be invaluable for finding a direct replacement.
- Observe the Shape: Note if it’s a high-lift, low-lift, or mulching blade based on its curves and fins.
Step 6: Record Everything
Write down all the measurements and any identifying marks. This information is crucial when you go to purchase a new blade.
Finding the Right Replacement Blade
Once you have your measurements and other details, it’s time to find a mower blade replacement.
Matching Measurements
- Length is Key: Your new blade must be the same length as your old one, or very close (within about 1/4 inch). Too long, and it can hit the deck; too short, and you’ll have uncut strips.
- Center Hole: This is non-negotiable. The center hole must match the spindle, including any splines or star patterns.
- Width and Thickness: While slightly different might be acceptable for width, try to match it. Thickness is more about durability; a slightly thicker blade might be okay if it fits, but very different thicknesses could affect performance.
Using Part Numbers
- Owner’s Manual: Your mower’s owner’s manual is the best resource. It will often list the correct blade part numbers for your specific model.
- Manufacturer Website: Most mower manufacturers have online parts lookup tools where you can enter your mower’s model and serial number to find compatible blades.
- Blade Manufacturer Websites: Companies that specialize in mower blades often have cross-reference guides online, allowing you to search by mower brand and model.
When to Consider Upgrading
- Better Mulching: If you want to improve your mulching capabilities, look for a blade specifically designed for mulching that matches your mower’s size.
- Increased Durability: For tough conditions, consider a thicker, heavier-duty blade, provided it’s the correct length and fits your spindle.
Frequently Asked Questions (FAQ)
Q: Can I use a blade that’s slightly longer than my old one?
A: It’s generally not recommended. A blade that is too long can hit the sides of the mower deck, causing damage to both the blade and the deck, and can also cause excessive vibration. Aim for an exact match or a blade that is no more than 1/4 inch shorter.
Q: What if my blade has a star-shaped center hole?
A: You need a replacement blade with the same star pattern. These blades are designed to fit specific spindle types. Measure the diameter of the imaginary circle that would enclose the star, and identify the number of points (e.g., 5-point star).
Q: How often should I replace my lawn mower blades?
A: Blades don’t last forever. They should be replaced when they become too worn, bent, or have nicks and chips that cannot be effectively sharpened out. Sharpening them regularly will extend their life, but consider replacement every 1-2 seasons for typical use, or sooner if you mow frequently or in challenging conditions.
Q: What’s the difference between high-lift and low-lift blades?
A: High-lift blades have upwardly curved “wings” that create strong suction for bagging or mulching, ideal for taller grass. Low-lift blades have less curve, generating less suction, which is better for sandy soil or avoiding scalping in sensitive lawns.
Q: How do I know if my blade needs sharpening?
A: Look for chewed or frayed grass tips after mowing, a ragged cut, or if you have to force the mower. You can also inspect the cutting edge – if it’s rounded or has visible nicks, it’s time for sharpening or replacement.
By carefully measuring your lawn mower blades and considering these important factors, you ensure your mower operates efficiently, cuts cleanly, and provides a beautiful finish to your lawn. Remember to always prioritize safety during any maintenance procedures.